
How to Unlock Your Car Without Scratching the Paint or Damaging Clear Coat
Sturvo Editorial · August 11, 2026
Important Safety & Legal Notice: This guide is intended strictly for vehicle owners or individuals with explicit, written authorization from the owner to perform self-entry on a locked vehicle. Never attempt to open a vehicle you do not own or have permission to access.
Emergency Safety Alert: If a child, vulnerable adult, or pet is trapped inside a locked vehicle, do not attempt a DIY lockout. Interior cabin temperatures can rise by 20°F in as little as 10 minutes, creating dangerous conditions rapidly (NHTSA Heatstroke Campaign). Official guidance from the CDC Extreme Heat Safety Guidelines warns that heatstroke can lead to permanent disability or death within minutes. Call 911 or emergency services immediately. Never let a DIY attempt delay calling emergency responders when safety is at risk.
Locking your keys inside your vehicle is stressful enough without adding a $500 body shop bill to fix gouged clear coat or chipped door paint. Unfortunately, improvised lockout attempts using metal screwdrivers, coat hangers, or hard metal pry bars are the leading cause of paint damage and torn weatherstripping.
Automotive clear coat is surprisingly thin—typically between 1.5 to 2 mils thick (roughly the thickness of a plastic grocery bag). Once a tool scratches through this protective clear layer, bare metal is exposed to humidity, leading to rust spot formation over time.
This guide explains how to unlock your car safely using non-marring tools and proper masking techniques that preserve your paintwork, door alignment, and rubber door seals.
Why Do DIY Lockout Attempts Scratch Car Paint?
Understanding how damage occurs makes it far easier to avoid. When people try to force open a locked door without specialized tools, damage usually happens in three specific areas:
- Concentrated Pressure Points: Using a rigid metal screwdriver or flat pry bar focuses hundreds of pounds of leverage on a quarter-inch section of the door pillar. This concentration of force cracks clear coat and dents sheet metal.
- Unshielded Metal Friction: Pushing raw steel rods or coat hangers past the door frame scrapes against exterior paint and interior door trim, leaving deep scratches along the roofline.
- Torn Weatherstripping Gaskets: Rubber seals tend to adhere slightly to door frames due to summer heat or winter frost. Forcing sharp tools past these seals rips the rubber out of its channel, causing wind noise and rain leaks later.
Tool Comparison: What Scratches Paint vs. What Keeps It Safe
Choosing the right materials is the single most important decision in a paint-safe car unlock. The table below details how common tools perform under real-world conditions.
| Tool Type | Material Composition | Risk to Clear Coat & Paint | Risk to Weatherstripping | Gap Control & Force Distribution |
|---|---|---|---|---|
| Wire Coat Hanger / Slim Jim | Unshielded Steel | High — Scrapes paint along window pillars and interior trim | High — Snags and tears rubber seals | Poor — Uncontrolled bending and slip risk |
| Screwdriver / Metal Pry Bar | Hardened Alloy Steel | Extreme — Cracks clear coat, dents metal down to primer | Extreme — Cuts through rubber gaskets instantly | Poor — High risk of permanent door frame bending |
| Hard Plastic Wedge | Rigid ABS Plastic | Moderate — Can leave scuffs if unpadded | Moderate — May scratch or pinch rubber | Fair — Concentrated wedge pressure |
| Inflatable Air Wedge | Smooth Thermoplastic Polyurethane (TPU) | Safe / Non-Marring — Spreads pressure evenly across 4+ inches | Safe — Glides smoothly past weather seals | Excellent — Fine valve adjustment in millimeter increments |
| Vinyl-Coated Reach Rod | Rubber/Vinyl Shielded Steel | Safe / Non-Marring — Smooth coating prevents metal contact | Safe — Non-abrasive surface | High — Precision maneuvering without metal friction |
Step-by-Step: How to Unlock Your Car Without Scratching Paint
By following a systematic method and using protective layering, you can gain entry without leaving a single mark on your vehicle.
Step 1: Layer Protective Painter's Tape Along the Door Frame
Before inserting any tool, apply two to three overlapping strips of blue painter's tape (or masking tape) along the edge of the door frame and the adjacent B-pillar. This tape creates a temporary sacrificial barrier. If a tool slips slightly, it contacts the tape rather than your clear coat.
Step 2: Use a Soft Pry Aid to Create an Initial Entry Gap
Never jam a thick tool straight into a flush door seam. Instead, take a smooth, non-marring plastic wedge or pry aid and gently press it into the upper rear corner of the door frame. You only need an opening of roughly 1/8 inch—just wide enough to slip in an uninflated air wedge.
Step 3: Insert and Inflate a TPU Air Wedge
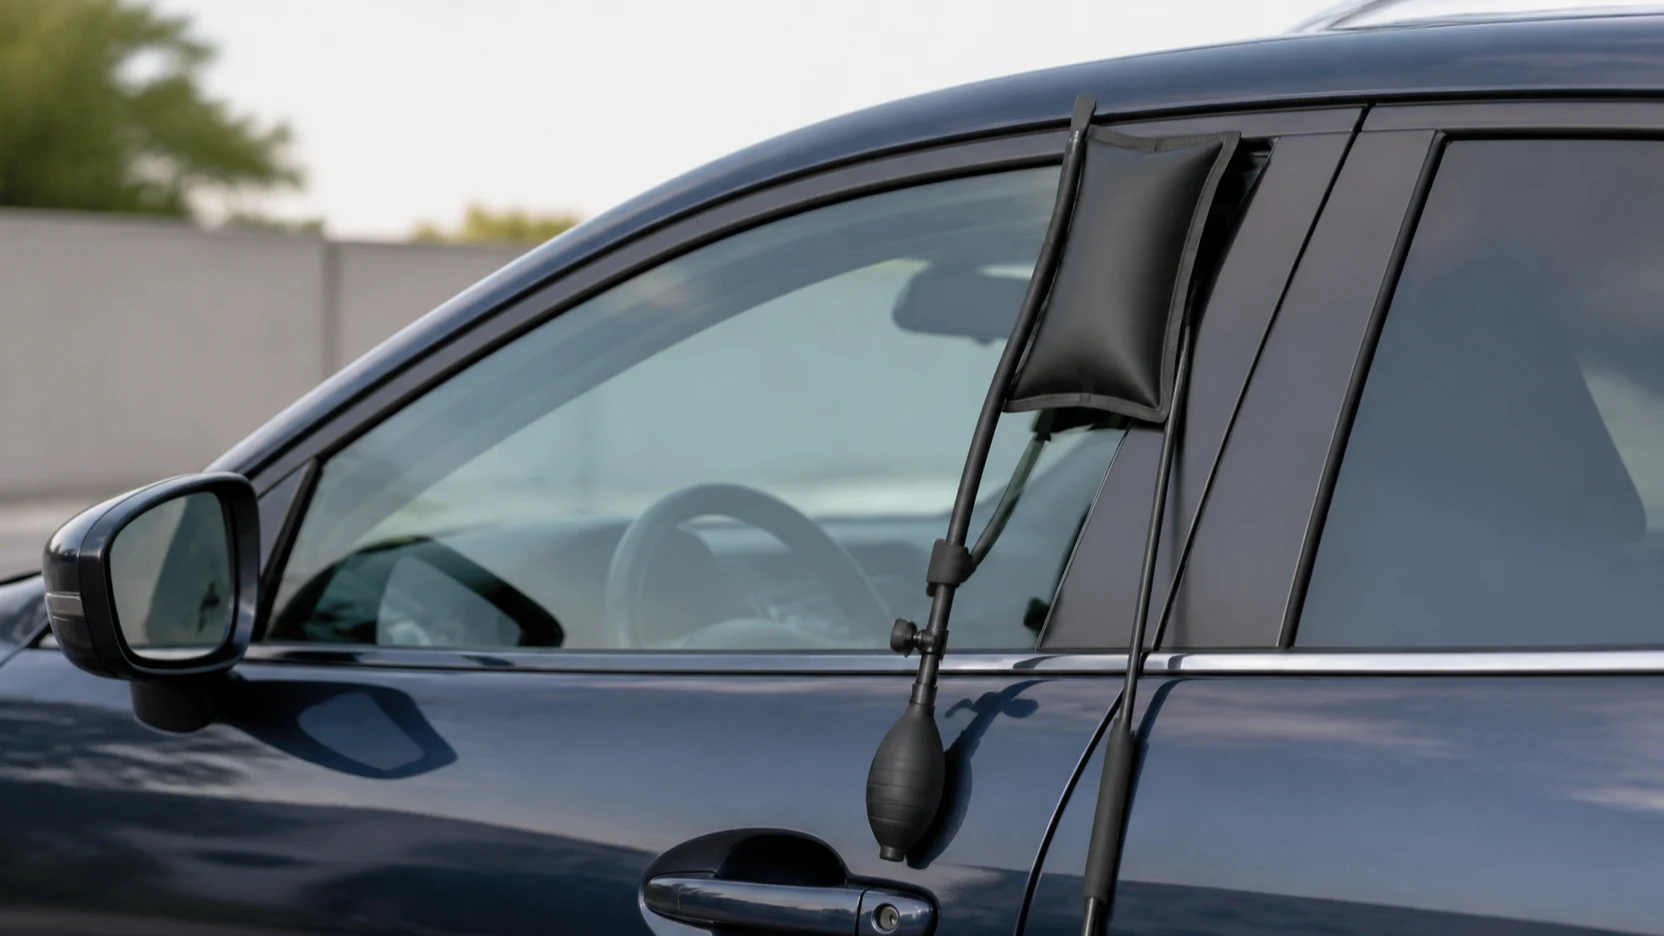
Slide a flat, smooth TPU air wedge between the door frame and the body pillar near the top corner of the window frame. Hand-pump the bulb slowly to inflate the bladder:
- Pump gradually: Watch the gap widen as you pump.
- Stop at 1/4 to 1/2 inch: You only need enough space to pass a thin reach tool. Over-inflating can bend the upper door frame permanently.
- Verify pressure distribution: The soft TPU bladder conforms to the shape of the door, spreading force harmlessly over a broad surface area.
Step 4: Thread a Rubber-Coated Reach Tool Through the Gap
With the gap secured, carefully thread a smooth, vinyl-coated long-reach rod into the cabin. Angle the rod toward your target:
- Electronic unlock button: Press firmly on the central unlock switch.
- Manual lock rocker: Hook or push the mechanical rocker toggle.
- Internal door handle: Loop the tool around the interior handle pull.
For a detailed walkthrough on rod angles and hook attachments, refer to our step-by-step tutorial on how to use an air wedge and long reach tool.
Step 5: Deflate the Air Wedge Before Tool Removal
Once the door unlocks, do not pull the reach rod or wedge out immediately while inflated. Deflate the air wedge completely by turning the brass valve counter-clockwise. Once the bladder collapses and pressure is released, slide out the reach tool and air wedge gently. Remove the painter's tape and inspect the door seam.
Crucial Tips to Protect Weatherstripping and Window Glass
- Always Work at the Upper Corner: The top rear corner of a sedan, SUV, or truck door has the greatest structural flex. Prying near the lower window line or side mirror risks cracking glass or breaking door hinges.
- Never Pivot Against Window Glass: Glass cannot handle lateral leverage. Always rest your wedge or pry tool against the solid steel B-pillar, never against the side window pane.
- Beware of Frozen Rubber in Winter: Cold temperatures make rubber weatherstripping brittle. If your car is frozen over, warm the door seam with your hands or warm water before inserting a wedge, as forced entry on frozen rubber can tear the gasket clean off.
DIY Lockout Kits vs. Professional Locksmith Services
When locked out, vehicle owners generally choose between calling a professional or handling the situation with pre-purchased tools.
Professional Locksmith Costs
According to automotive service surveys published by Consumer Reports Automotive Guidelines and safety recommendations from AAA Roadside Assistance, a typical U.S. locksmith visit ranges between $50 and $150 per callout. Rates vary depending on your geographic location, weather, and whether the call occurs after hours or on holidays.
Emergency Preparedness with a DIY Kit
Carrying a complete lockout setup like the Sturvo 27 PCS Car Lockout Kit (~$33 one-time) in your garage, second family vehicle, or home entry closet offers an immediate, paint-safe alternative. A single successful self-recovery pays for the kit while sparing your vehicle from expensive body shop paint repairs.
When to Stop DIY and Call a Professional
Knowing when to step back is key to protecting your vehicle. You should stop DIY attempts and contact a professional locksmith or dealer if:
- Your vehicle uses high-security deadlocking mechanisms that disable interior handles when locked.
- The vehicle battery is completely dead, rendering electronic unlock buttons unresponsive.
- You encounter strong mechanical resistance that requires excessive force to move.
- You feel unsure about maneuvering tools safely around side-curtain airbags.
For a full breakdown of time, cost, and risk factors, read our guide on car lockout kits vs locksmith services.
Frequently Asked Questions About Paint-Safe Car Unlocking
Will an air wedge permanently bend my car door?
No. Modern car doors are engineered with spring steel memory. When inflated only to the recommended 1/4 to 1/2 inch gap, the frame returns flush against the rubber seal as soon as the air wedge is deflated.
Can I use household oil or WD-40 to help slide tools past weatherstripping?
Avoid petroleum-based lubricants like standard WD-40 on vehicle weatherstripping. Petroleum can degrade and soften synthetic rubber over time. Use blue painter's tape or a tiny dab of soapy water instead.
What should I do if my keys are locked in the trunk?
If your vehicle has a fold-down rear seat lever or an active interior trunk release button, you can use a long-reach tool through the door gap to trigger access to the trunk. For general recovery strategies, see our overview on what to do when keys are locked in your car.
Sources
- NHTSA Heatstroke Safety Campaign: https://www.nhtsa.gov/campaign/heatstroke
- CDC Extreme Heat Safety Guidelines: https://www.cdc.gov/extreme-heat/about/index.html
- Consumer Reports Automotive Safety & Maintenance: https://www.consumerreports.org/cars/
- AAA Automotive & Roadside Services: https://www.aaa.com/
Locked Out? Get Back In Yourself
The Sturvo 27 PCS Car Unlock Kit includes an inflatable air wedge, long reach tools, pry tools and a zippered carry bag — everything mentioned in this guide, for less than a single locksmith visit.
As an Amazon Associate we may earn from qualifying purchases.